These manipulatives, which are marketed for preschool counting and sorting, are great for targeting auditory skill development as well as expressive and receptive language skills and early concepts. There are six different vehicles in six different colors. This closed set allows for fun lessons that can target 1-2 critical elements during listening activities. To target one critical element you would use either all six vehicles in the same color (ex. blue car, blue school bus, blue airplane, blue train, blue boat, blue firetruck) or the same vehicle in all six colors (ex. red boat, blue boat, green boat, yellow boat, orange boat, purple boat). By adding all the different vehicle types as well as all the colors you can really up the ante and target two critical elements. For an extra challenge, and to eliminate some of the "clues", you can control the set to only have one syllable colors and vehicles (ex. red boat, blue train, green car) or only multisyllabic items (ex. yellow airplane, purple school bus, orange firetruck). If you want to continue to up the ante and target three critical elements, you can use a child-friendly printed town map or playmat rug as pictured below (ex. Drive the blue school bus to the farm. Drive the red firetruck to the police station.).
As always, I will add sign language support to aid and ensure comprehension and success. I also often use pictures to support the lesson, for children who do not yet have all of the colors, vehicles and locations in their receptive vocabulary.
Lift-the-flap books continue to be one of my favorite ways to engage with preschoolers, target vocabulary, and elicit communication. I hold them out of reach so the students need to make a request to see/look. This particular Karen Katz series is great for working on seasonal and holiday vocabulary as well as location words (in, under, behind, etc.). We fold in some core language as well, including want, turn, my/your/I, see, open, and more.
So, at four weeks post activation there are not any substantial changes. I have continued to practice the Ling sounds at the beginning of each therapy session. While my student still needs to see my lips or my signs to choose the correct corresponding picture ("mmm" - eating ice cream, "oo" - train, etc.), I've noticed that her vocalizations in response to mine are starting to more closely resemble what I'm producing. In particular, my student is making close approximations for "oo" and "ah". My student is also shaping production of "ow" when repeating/copying "out" during activities using my small, velvet bag. At this time, I don't feel confident that my student is detecting "sh" or "ss". We have also continued to repeat known routines, such as Bingo paint dabbers and "Critter Clinic", focusing on the repetitive words/phrases (open, turn-turn-turn, 1-2-3...Stop, out, bye-bye). We have continued to work on learning the names of all the classmates and teachers. These can't really be used for auditory training purposes yet, because my student is still learning them. I introduced my "knock-knock" board this week and used it to practice names, placing the individual student/staff pictures behind each of the nine doors. We will again build a routine with this activity (knock-knock-knock, open, who, bye-bye) and reuse it throughout the year with other target vocabulary. All of my preschool students have also worked on sorting the pictures by boy vs. girl and teacher vs. student. In the next two weeks, I'd like to focus in on discrimination by syllable number. My student has a limited receptive/expressive vocabulary, so I will probably use colors (ex. yellow vs. blue, purple vs. green, orange vs. red) as well as names of classmates, particularly one- vs. three-syllables names.
My students absolutely LOVE this game. Even my older students still ask for it. I'm going to bring it over to the middle school this week. Because it's so motivating, I use it for practice/drill based activities. If the students are working on producing /s/-blends at the word level, then they practice that before they get to take their turn. If they are practicing word final consonants at the sentence level, they practice that before they get to spin the spinner. You can target verb phrases/tenses, pronoun use, vocabulary...honestly anything. You just build it into each students' turn in the game. For the younger students it's also great for targeting colors and understanding "1" vs. "2". For young students, or any students with fine motor challenges, this game is great for working on that as well. In order to use the squirrel to pick up the acorns and place them in the tree stumps, they need to squeeze, hold, and release. Even spinning the spinner and isolating that index finger is a great skill to practice and develop.
Across the board, everyone's favorite part is when the spinner lands on the "sneaky squirrel" and they get to steal from another player. I often play the game with the students so that they can steal from me. I can model being a good sport about it and help ward off some of the meltdowns for students that can't quite handle having their acorn stolen.
Now I know you all already know about this game. It is a quick, fun activity when you have a small group for therapy. There are so many versions of this game, readily available to print and use, that you can target almost anything...articulation, vocabulary, or grammar. That said, "I Have...Who Has?" is also great for targeting and working on auditory skill development and communication repair with students that are Deaf and Hard of Hearing.
This game provides you with a closed set already framed in a predictable, repeated carrier phrase ("I have _____. Who has _____?). Depending on what game you choose to use, for example fall vocabulary vs. minimal pair /s/-blends , you can use maximally contrasting words (leaf vs. apple picking) or up the ante of the listening complexity (sand/stand). Another bonus, you get to repeatedly target the expressive use of have vs. has, which tends to be very challenging for Deaf/HoH students.
In addition, many of my students are much more successful understanding me, with my clear, well articulated, adult "teacher" voice, but struggle to understand their peers. This game forces that interaction and allows for natural practice of communication breakdown repair. Of course, if and when sign language is needed to ensure comprehension and success, I am going to add that in.
So many of you are probably already using smashmats in therapy. They are great for targeting speech articulation or theme-based vocabulary (expressive and receptive). But have you ever thought of using them for auditory skill development with your Deaf and Hard of Hearing students?
If your students have listening goals targeting discrimination, identification, and comprehension, smashmats are a fun and motivating way to work on them. All you really need to do differently is add the use of the acoustic hoop. The smashmats developed for articulation are often the best for targeting discrimination. They typically contain sets of pictures that are very similar in terms of their consonants, vowels, and syllable structures. Consider the image on the top right of this post (hat, hot, cat, bat). When using the theme-based vocabulary smashmats, such as the one on the top left of this post, the words are very different in structure. However, they are still great for working on identification through listening alone. You can embed the words in a carrier phrase or sentence to add to the complexity of the listening task (ex. Find the ____ and smash it!).
If I am working with two students at the same time, I will provide each with their own mat and then put a barrier in between them so that everyone does their own listening. When I am working with only one student, I often will give myself a mat. This allows it to become a turn-taking activity. In addition, we are now targeting both listening (my turn) and expressive language (spoken or signed) and/or speech articulation (their turn). Another tip...for some of the younger students, or students with additional challenges, I keep all the play dough balls out of their reach and give them one at a time.
Using smashmats like the ones above, you can also target sentence comprehension. Depending how you formulate the sentences, you can have up to three critical elements (ex. She has a pink flashlight. vs. He has a blue flashlight. vs. They have a blue cooler.). If you have a mat yourself, now you're targeting listening, vocabulary, and grammar!!!
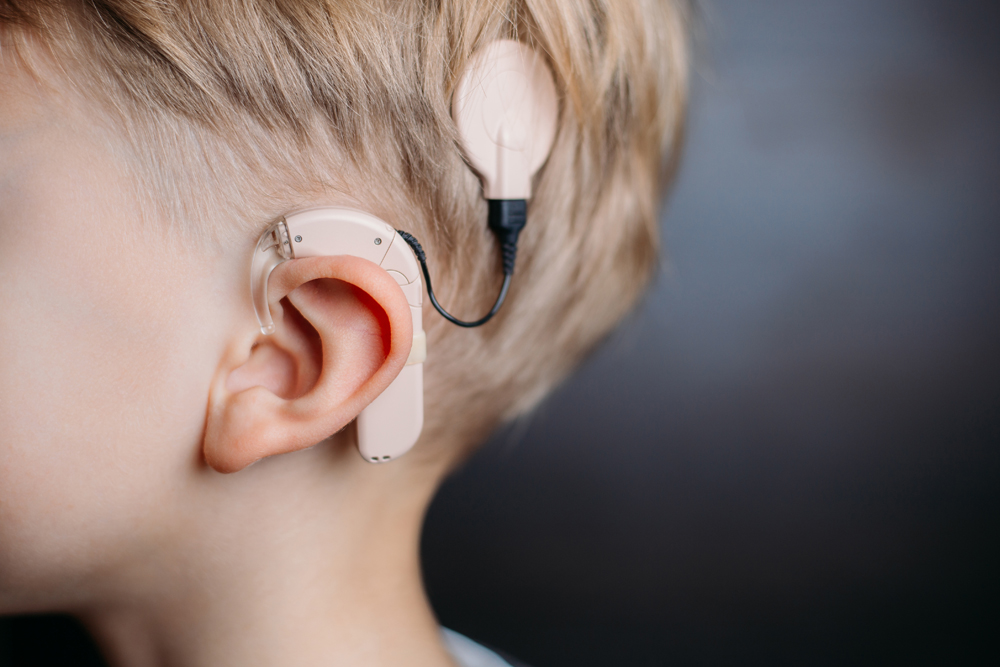
This past week was the first week of preschool. My student that underwent cochlear implant surgery over the summer was activated just two weeks before school started. I was only able to have two sessions as the student missed a day of school for an audiological follow-up appointment.
At both sessions we began by working on Ling sound detection and discrimination. My student definitely appeared to detect all of the vowel sounds (oo, ah, ee) as well as "mm". Each time I produced one of these sounds behind the acoustic hoop my student would vocalize a neutral vowel, most similar to "ah". I needed to add the visual of my mouth for my student to produce a closer approximation of the target sound. I did not see any real indication that my student detected "sh" or "ss" at this time. For all of the sounds, it was not until I showed the picture and added sign language that my student appeared to comprehend and make a meaningful connection.
Before implantation, this student and I had built a routine using the Animal Clinic toy with doors/keys that I blogged about in an earlier post. Over and over for each door, we use the same words/signs (key please, blue key, turn-turn-turn, open, out, bye-bye, in). I used that toy this week, so that we can start mapping sound onto the routine. This will allow us to start working on discriminating between words that differ by syllable number (out vs. open vs. turn-turn-turn) as well as long and short sounds (ooooo-pen vs. bye-bye).
We have a lot of new students in the preschool and kindergarten this year. With the help of our fabulous paraprofessionals, I was able to get a close-up picture of each students' face. They are printed and laminated and I have two sets. Using the mailbox toy that I blogged about in a prior post, my recently implanted student and myself labeled and "mailed" all the pictures. I modeled their spoken names and also their sign names. At this point my student only copied the signing and did some vocalizing. As these new friends and their names become more familiar, we can start to use them in listening-based activities. Unfortunately, I've come to the realization that in the whole group of 12 students, only one student has a one-syllable name :(
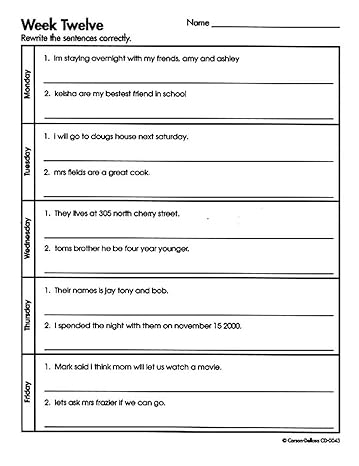
This is an excellent tool for upper elementary and middle school students. It is especially helpful when working with Deaf and Hard of Hearing students for whom English grammar can be particularly challenging. Many of the morphological markers and function words are hard to hear and are not represented in ASL, at least not in the same way.
While this activity was intended to be an individualized paper/pencil task, I typically make it a group activity on my whiteboard with dry erase markers. We do two sentences each time. I typically let the students know how many mistakes they need to find, and make sure the number of mistakes is equal to or greater than the number of students participating so that everyone gets a turn. If I know that one or two of my students finds this type of task very difficult, I usually call on them first. This gives them more possible response options, and often the opportunity for something basic like an uppercase letter at the beginning or a period at the end. When a student does identify an error, I always ask them to explain why, giving me the English rule. I will give hints when they can't find all the mistakes. This past week with my 6th graders I put a sentence on the board that used the wrong there/their/they're twice. When they couldn't find the error I "English signed" it as it was written. The ASL interpreters got a good laugh and the kids all looked at me like I was completely nuts...but they got the point.
For my 4th-8th graders, I typically start at least one session per week with "AIR time". This simply means that I have written on the whiteboard on my wall one verbal analogy, one idiom, and one riddle. I typically try to have them be related to the seasons/holidays. For example (Back to School)...
A - Book is to library as food is to ____________.
I - "Hit the books"
R - What school supply is the king of the classroom?
For many students, but particularly students that are Deaf or Hard of Hearing, these types of activities that target figurative language, multi-meaning words, semantic relations, and "playing with words" is very challenging. I typically have one of the students read each item. For the analogy, I ask if the students know all the words because you can't answer if you don't know what all the words mean. A great way for my Deaf students to show me that they know is to sign them. If they don't know a word, then I present that particular word in a personally relevant and/or highly relatable context. I teach my students that a verbal analogy is like a math sentence. It has to be equal on both sides. So, if there's a "thing" and "where we find it" on one side then there has to be a "thing" and "where we find it" on the other side. The relationships have to be the same/equal.
When we focus on the idiom, I often will act out or discuss the literal interpretation first. If I have an ASL interpreter working with me, I ask them to sign it in "English" so they don't give it away. The reality is if they interpreted "hit the books" they would just sign "study" and my student would likely miss that English-sign connection. Once we've established that the idiom can't possibly mean the literal interpretation, I try to present it in a highly-relatable context. For "hit the books" I might talk about finding out that they have a science test in two days so they better "hit the books." This is a great way to work on using context to determine meaning.
For the riddle, I typically let them guess and then try to give some hints. The reality is, most of the time, I end up providing the answer. While some students may still look confused, if the student laughs or like many of my pre-teen students, tries not to laugh or I get an eye roll, then I know they have understood.
Playing with language is very challenging for most of my students...so we have frequent practice with direct and explicit instruction.
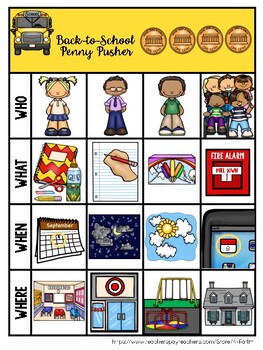
Penny Pushers are another favorite activity I use for receptive language (any student) and auditory skill development (Deaf and Hard of hearing students). Depending on the language level of the students, I typically use this with Knd-2nd graders, but have had older students for whom this was still very appropriate. This activity was created by K Ratliff and is available for free download on Teachers Pay Teachers. Penny Pushers are available for all four seasons and a variety of holidays as well. Each set comes with around eight different stories that are approximately 3-5 sentences in length, so the activity is quick and repeatable within and across therapy sessions.
I start by giving each student participating a laminated copy of the response chart. I then give each child four pennies. While the students often want to put them on the penny illustrations at the top, I find it more helpful to place them on the "wh" question words along the side. This is a better visual representation of one per row. If I am working with more than one student, I put up some kind of visual barrier so that they can't see each other's responses. I tell them that I want everyone to do their own thinking. Before I read/sign the story, we typically go over the possible response options for each row to make sure they understand the targeted vocabulary. The "when" row usually needs the most attention, particularly for students who are not yet reading words at that level (Thursday, August, etc.).
Once we've established that the students understand the possible response options, it's time to read and/or sign the story. I always remind them that the rule is not to do anything but listen/watch until I say, "Slide your pennies!" If I am targeting auditory comprehension with my Deaf and Hard of Hearing students, then the first 1-2 presentations will be using my acoustic hoop so that it is a true listening task or present it orally without sign support. While this is a challenging listening task, having the pictures for support aids in word discrimination and identification. If I notice that one of my Deaf/HoH students has only 1-2/4 correct, then I will reread the story with sign support to ensure comprehension regardless of mode. After the story has been presented, we go over the correct answers, with each child getting a chance to go first for at least one question. Some children choose to share how they did, but the barriers allow for each student's performance to remain private. For the "who" row, I often ask them how they knew it was a boy/man vs. girl/woman vs. more than one person so we can highlight the pronouns used within the story (she/her/hers, he/him/his, they/them/their). And, of course, if everyone gets 4/4 then we all stand up and do a "winners dance"!!!